PlanningSpace Data Connector
PAGE CONTENTS
The "PlanningSpace Data Connector" (PDC) is an add-in for Microsoft Excel, which can be used to extract data from Planning Space into Excel, and to insert data into Planning Space. Thus, users are able to use any Excel-based functionality to seamlessly process Planning Space data. (Note: the PDC is built as an Office Add-in and this is not the same technology as VSTO and COM add-ins; for explanation see Office Add-ins platform overview.)
IPS Server needs to run an additional service to handle client requests coming from Microsoft Excel/PDC as a client application.
The PDC module is automatically-deployed during the installation of IPS Server. This topic explains the required configuration steps on the server, as well as the steps for manual installation.
Requirements
Secure HTTP requirement for IPS Server: To deploy the PlanningSpace Data Connector add-in requires that IPS Server is running in HTTPS mode, or SSL Offloading mode.
PDC end-user requirements: The minimum version of Excel to use the PDC add-in is Microsoft Office Excel 2016 (desktop application), or Microsoft 365 Apps for enterprise (also known as Office 365 ProPlus, desktop application or online). Office 2016 must have its latest updates installed because the version of the Microsoft 'Dialog API set' must be 1.1 or higher. Depending on the Office version and overall configuration, users of the PDC may need to be made aware of the location of a 'shared manifest folder' which they will use to configure their personal Excel setup.
For version 16.5 Update 11 and later: The PDC tool performs a check of Microsoft API versions and it will display the information in its startup screen. If the PDC check function detects incompatible API versions in Office then the PDC tool will not show a login dialog and it will not be usable.
Automatic installation
The PDC add-in module is automatically installed and deployed by the IPS Server installer. The module is installed in the folder:
C:\Program Files\Palantir\PalantirIPS 16.5\Modules\PlanningSpaceDataConnector
If you do not want the PDC add-in to run in your deployment: you need to remove the 'PlanningSpaceDataConnector' folder, then restart the IPS Service.
PDC port configuration
The PDC will use server ports 9139 and 9239 by default. If these are otherwise in use you will need to modify the Application Ports setting in the IPS Manager 'Service' screen:

If the port numbers are changed then a restart of the IPS Service will be required.
Test the PDC application
You can test that the PDC application has started successfully by using a browser to view the URL (substituting your actual Planning Space server address and tenant name):
'https://ips.mycompany.com/tenant1/planningspacedataconnector/addin/v1/home/home.html'
which should display a web page like the following:

Configure the Add-in XML manifest file
In order to access the PDC service from Excel, the user needs to have access to an Add-in manifest file, which defines the location of the PDC web application (as it was configured above).
The first step is to edit the template manifest file.
The template manifest file is included in the PDC module folder as 'PlanningSpaceDataConnectorAddin.xml'. Make a copy of this file and edit it (using a text editor, for example Notepad, or an XML file editor) so that every instance of the text 'https://server.domain:customport/TENANT' is replaced with your actual Planning Space server address, tenant name, and custom port number (if not using the default 443). For example: 'https://ips.mycompany.com/tenant1' or 'https://ips.mycompany.com:444/tenant1'. (Note: the template manifest file can also be accessed via the web using a URL of the form 'https://ips.mycompany.com/tenant1/planningspacedataconnector/PlanningSpaceDataConnectorAddin.xml'.)
If you are providing PDC access for more than one Planning Space server, you can edit the 'DefaultValue' attribute in the DisplayName
tag to show a different heading in the Excel PDC panel, for example the server name. The default value is 'PlanningSpace™ Data Connector'.
The next step is to make the manifest file available to users, as explained in the following sections.
Administrator deployment of the Add-in XML manifest file
The XML manifest file can be deployed using a network share folder, which works for Microsoft Office 2016, or Office 365. Office 365 also offers a centralized deployment using its Admin Center.
Microsoft 365 Apps for enterprise (also known as Office 365 ProPlus): Centralized deployment using Microsoft 365 Admin Center
This setup can only be done by IT Administrators with access to the Office 365 environment.
The process of adding the XML manifest file is explained in Microsoft's documentation: Manage deployment of Office 365 add-ins in the Microsoft 365 admin center.
Deploy a shared manifest folder
The manifest folder needs to be a network share folder in your corporate Windows network that is accessible to all Excel/PDC users.
Each user will configure their own Excel setup with the shared folder specified as a Trusted Add-in Catalog.
Copy your edited XML manifest file to the shared folder, and ensure that it will be read-accessible for all users of the PlanningSpace Data Connector.
User installation of the Add-in XML manifest file in Excel
The PDC appears to users in Excel as an 'Add-in'. The installation steps needed depend on how the add-in has been deployed.
PDC as an 'Admin Managed Add-in' (only for Microsoft 365 Apps for enterprise [also known as Office 365 ProPlus])
This requires that the PDC Add-in has been deployed centrally using Microsoft 365 Admin Center.
In Excel, click 'My Add-ins' on the 'Insert' ribbon, to open the 'Office Add-ins' selector, and then click the 'ADMIN MANAGED' tab:

Double-click on the PDC Add-in button, and it will be locally installed to the personal Excel setup. A new button will appear in the 'Insert' ribbon. Clicking this button will open the PDC control interface in Excel:

Using the shared manifest folder as a 'Trusted Add-in Catalog'
If a shared manifest folder has been deployed, users will need to know its share path in the corporate Windows environment.
Set the Trusted Add-in Catalog (this needs to be done only the first time that you use the PlanningSpace Data Connector):
- Start Excel, and open the 'Options' dialog (via 'File' in the top menu).
- Click 'Trust Center' in the menu, and click the 'Trust Center Settings' button.
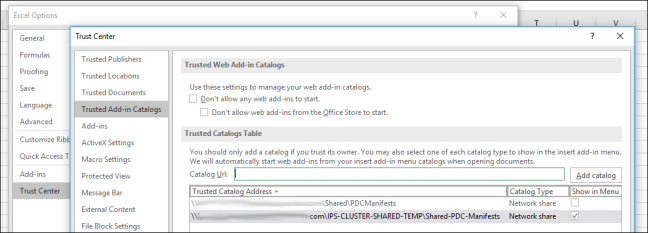
- In the second pop-up dialog, click 'Trusted Add-in Catalogs' in the menu, and enter the shared folder location in the 'Catalog Url' field, then click 'Add catalog'.
- If you have more than one Trusted Catalog Address saved, you will need to make the new address active in Excel by clicking its 'Show in Menu' radio button.
- Click 'OK' twice to close the options dialogs.
You need to restart Excel to make the new shared folder active to access the PDC add-in.
Next, click 'My Add-ins' on the 'Insert' ribbon, to open the 'Office Add-ins' selector, and then click the 'SHARED FOLDER' tab.

Double-click the PDC Add-in button, and it will be locally installed to the personal Excel setup. In Office 365, a new button will appear in the 'Insert' ribbon (see screenshot above). In Office 2016, the add-in can be launched by clicking the drop-down menu of 'My Add-ins' on the 'Insert' ribbon.
PDC for multiple tenants or multiple IPS Servers
If you are offering the PDC to users for multiple Planning Space tenants and/or IPS Servers, each tenant will need its own XML manifest file to be deployed, using the steps explained above.
Additional to this, you will need to:
- Give the manifest files different and informative names (but the names are not visible to PDC users within Excel).
- Edit the value of the
Idtag to be different for each manifest file. You can edit the UUID manually to be different, or generate a new UUID using, for example, the PowerShell commandNew-Guid. - Edit the label string in the
DisplayNametag: this is the label that users will see in the 'Office Add-Ins' selection dialog. - Edit the value of the 'DefaultValue' attribute in the tag:
<bt:String id="residLabel3" DefaultValue="Data Connector">
This is the label that users will see for the Add-in button on the ribbon.
For example, you could have PDC connections to 'production' and 'test' servers set up as follows:
| PlanningSpaceDataConnectorAddin-PROD.xml | PlanningSpaceDataConnectorAddin-TEST.xml |
<Id>21723778-1E5A-4706-92A8-58D1AA63A2B0</Id>
|
<Id>21723778-1E5A-4706-92A8-58D1AA63A2B1</Id>
|
<DisplayName DefaultValue="PlanningSpace"/>
|
<DisplayName DefaultValue="PlanningSpace TEST"/>
|
<bt:String id="residLabel3" DefaultValue="PDC">
|
<bt:String id="residLabel3" DefaultValue="PDC TEST">
|